ELISA Diagram Generator
Use an ELISA diagram generator to explain coating, sample binding, detection, washing and optical readout. Draft a workflow without fabricating patient results or assay performance.
SEE ACADRAW IN ACTION
Science drawing, from idea to editable figure
Create a science illustration with AI. Refine drawings, build editable diagrams, and convert images to SVG.
Demos play as you scroll into view. Choose a feature to explore.
Trusted by students & researchers from 480+ universities
A global community spanning 60+ countries and regions, from QS top-ranked universities to leading research institutes























University logos belong to their respective institutions and are shown solely to illustrate our user community. They do not imply any partnership or endorsement.
Tool overview
Explore the use cases, workflow, and key things to know.
Define the purpose
State whether the figure explains a setup, process, interpretation or reporting boundary.
Label the convention
Explain what each arrow, line, color or control means.
Review the limits
Keep generated visuals separate from real measurements and source files.
Concept reference
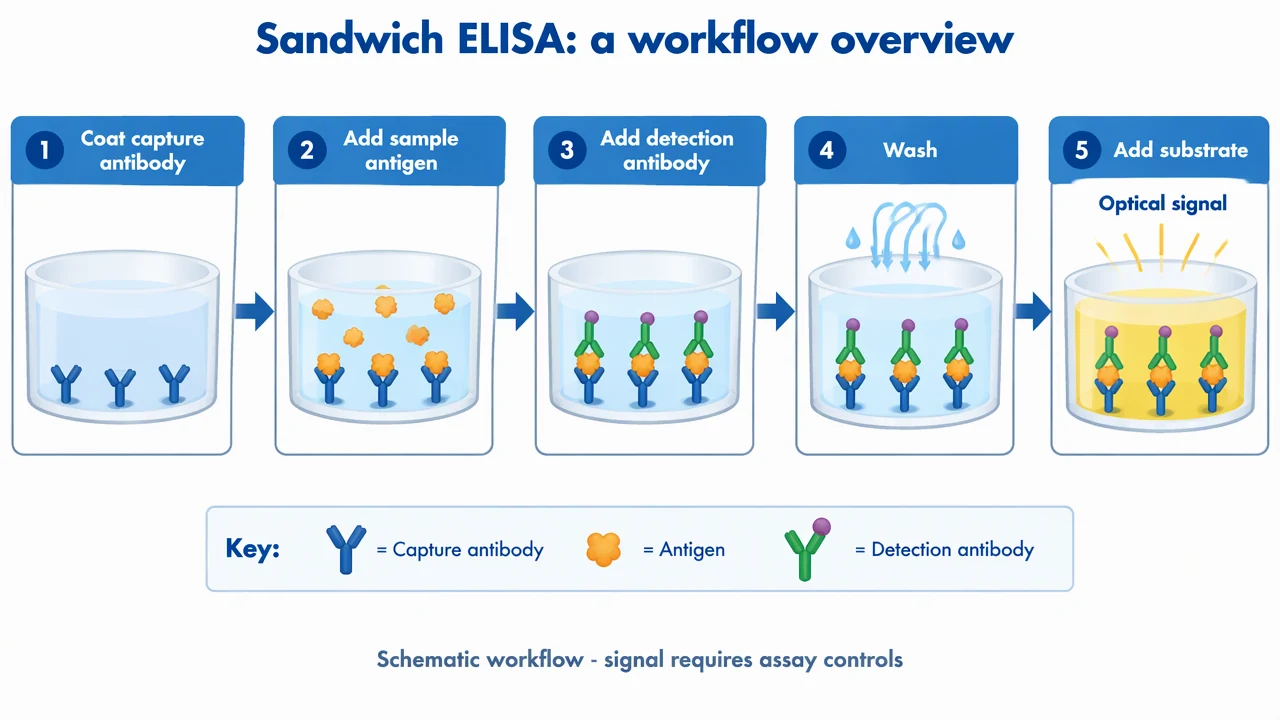
Sandwich ELISA: a workflow overview
A five-stage sandwich ELISA workflow from capture antibody coating through antigen binding, detection antibody, washing and substrate signal. The signal is a teaching cue, not a patient result or standard curve.
ELISA Diagram Generator: reference key
Use the reference and definitions together. On a small screen, scroll the table horizontally.
| Element | Meaning | Review check |
|---|---|---|
| Capture antibody | The immobilized binding reagent | Define specificity and coating conditions in the protocol. |
| Antigen | The target or analyte | A visual icon is not a measured concentration. |
| Detection antibody | The second recognition reagent | Explain whether it is labeled directly or uses a secondary reagent. |
| Wash | Removal of unbound material | Show every important wash boundary in a teaching workflow. |
| Substrate | The signal-producing reagent | Signal interpretation needs controls and a calibration design. |
| Optical readout | A measured assay output | Do not invent absorbance values or diagnostic cutoffs. |
ELISA Diagram Generator: plan the content
An ELISA diagram should show the binding sequence and the wash steps that separate bound from unbound material. Treat the optical signal as a measured output only when actual assay data support it.
Start with the purpose of the elisa diagram
A useful elisa diagram begins with one question. Decide whether the visual should explain setup, process order, interpretation or a reporting boundary. A crowded diagram can contain accurate icons and still fail if the reader cannot tell what to notice first. The reference image is deliberately bounded. It uses labels and arrows to organize a teaching explanation, not to substitute for a protocol, a result file or a validated device. Write the scope in the caption before adding detail.
Separate the visual convention from the claim
Colors, line weights and arrows help a reader follow a elisa diagram, but they do not automatically represent measured magnitude or certainty. Define what an arrow means and state when a panel is illustrative. If the figure includes a control, label what decision that control supports. This distinction matters when a familiar visual resembles a result. A band, test line, gate, signal or property label can look authoritative even when it is only a teaching placeholder. Preserve that boundary in the legend and surrounding text.
Keep provenance and review visible
Before sharing a elisa diagram, compare every label with a reliable source and the actual question. Record the source image, method context, assumptions and edits. If the topic involves an assay or material, keep experimental observations in their own record rather than filling gaps with a plausible generated visual. A concise reference key makes review easier. It tells collaborators which terms are structural, which are process events and which are interpretations. That key is often more valuable than adding another decorative arrow.
Common mistakes in a elisa diagram
Separate the visual convention from the claim
Colors, line weights and arrows help a reader follow a elisa diagram, but they do not automatically represent measured magnitude or certainty. Define what an arrow means and state when a panel is illustrative. If the figure includes a control, label what decision that control supports. This distinction matters when a familiar visual resembles a result. A band, test line, gate, signal or property label can look authoritative even when it is only a teaching placeholder. Preserve that boundary in the legend and surrounding text.
Keep provenance and review visible
Before sharing a elisa diagram, compare every label with a reliable source and the actual question. Record the source image, method context, assumptions and edits. If the topic involves an assay or material, keep experimental observations in their own record rather than filling gaps with a plausible generated visual. A concise reference key makes review easier. It tells collaborators which terms are structural, which are process events and which are interpretations. That key is often more valuable than adding another decorative arrow.
Use the draft as a reviewable starting point
The elisa diagram tool helps turn a brief into a visual draft. It cannot decide whether a sample is valid, whether a mechanism is complete or whether a conclusion follows from a measurement. Ask a domain reviewer to check the final figure when the visual will guide an experiment, publication or health decision. Export the figure with a caption that names the scope and limits. Keep real data, source files and calculation records linked to the final version. A transparent workflow lets readers understand what the image explains and what it leaves unanswered.
ELISA Diagram Generator: from brief to reviewed draft
Reading the reference is free. Generating a new draft requires an account and available credits. See current pricing.
Choose Science Drawing for an illustrated draft, or Editable Diagram for separate shapes and labels. Review all definitions, labels and connections before sharing.
- 1
Write a bounded brief
Describe the scope, participants and visual conventions needed for this figure.
- 2
Generate a structured draft
Choose an illustrated or editable layout, then keep labels and arrows explicit.
- 3
Review before sharing
Compare the result with the source, method or design record and revise unsupported claims.
Example brief for a elisa diagram
Original educational ELISA workflow diagram, white 1280x720 landscape, clean vector-like scientific style, readable English labels. Title 'Sandwich ELISA: a workflow overview'. Five connected panels left to right: 'Coat capture antibody' on a microplate well, 'Add sample antigen' with antigen icons, 'Add detection antibody' showing a second antibody, 'Wash' with rinse arrows, 'Add substrate' with a color change in the well and label 'Optical signal'. Include a small key: capture antibody, antigen, detection antibody. Footer 'Schematic workflow - signal requires assay controls'. No quantitative standard curve, no patient result, no diagnosis, no copied artwork, no logo. All arrows and labels generated in the image.
Use this prompt in the generatorELISA Diagram Generator: common questions
What does the elisa diagram tool create?
It creates an educational draft from your description. It does not infer real measurements or validate an experiment.
Does the ELISA example provide a concentration?
No. Optical signal requires a real calibration design, controls and measured readings.
What should I review before sharing?
Check labels, directions, scope and the source-specific details in the elisa diagram figure.
Does it support real data analysis?
No. This page is for qualitative visual explanation and editable drafting, not computation from a data table.
Sources and editorial notes
Prepared by the AcaDraw product team. Source and diagram check: . This is a simplified educational model; independent expert review has not been completed. AI-generated drafts need checking against reliable references.
Read the elisa diagram guide
An ELISA diagram should show the binding sequence and the wash steps that separate bound from unbound material. Treat the optical signal as a measured output only when actual assay data support it.
ELISA Diagrams: Coating, Binding, Washes, and Readout